Tuesday, November 20, 2012

Aloo Gobi

5


Ours is a Chappati/roti loving family. On any given day, all of us in the house would unanimously vote for rotis than for rice. Till last year I used to make about 20 rotis everyday in the evening for dinner with some curry. But since the time we’ve moved to Chennai, roti making has become a very difficult task. We moved to Chennai in the month of April and it was so very hot at that time that staying in the kitchen and preparing elaborate meals seemed to be a Herculean task. With heat as an excuse, slowly, rotis started making very rare appearances in my kitchen.


But off late I must say, the weather in Chennai has changed. It is really very pleasant and I don’t feel the need for a fan even in the afternoons. Now this was something I had never imagined.  I sincerely hope that this weather lasts for a couple of months. Anyways, with this pleasant breezy weather, I decided to make our favourite meal more often.

 Making rotis is much easier than deciding the side dish to go with it isn’t it? So here is a simple and delicious side dish which would go perfectly with your warm rotis.


What you’ll need
Serves 4
  1. Cauliflower Florets – 3 cups
  2. Potato – 1.5 cup, cut into cubes
  3. Onion – 2, chopped fine
  4. Tomato – 3, chopped fine
  5. Ginger – 1 inch piece, grated
  6. Coriander Powder – 1 tsp
  7. Chilly Powder – 1 tsp
  8. Garam Masala Powder – ½ tsp
  9. Turmeric Powder – ¼ tsp
  10. Salt to taste
  11. Oil – 1 tbsp
  12. Cumin Seeds – 1 tsp
  13. Fresh Coriander Leaves for garnishing

Method
  1. Soak the cauliflower florets in hot water for about 5 minutes to remove worms if any. Drain, rinse well and set aside.
  2. Heat a Kadai with oil, add cumin seeds.
  3. After they change color, add the chopped onions and grated ginger and sauté for 3 to 4 minutes or till the onions turn light brown.
  4. Now add the potatoes, and turmeric powder. Mix well, cover and cook for 3 to 4 minutes on medium to low heat.
  5. After the potatoes are half cooked add the cauliflower florets and salt to taste. Mix well cover and cook for another 7 to 8 minutes on medium to low heat, stirring once in a while, till the vegetables are cooked. You can sprinkle some water if you feel that the veggies may stick to the pan.
  6. Now add the coriander powder, chilly powder and garam masala powder and mix well. Fry for a minute.
  7. Finally add the chopped tomatoes, stir well again cover and cook for about 5 to 6 minutes or till the tomatoes have turned mushy.
  8. If you want a completely dry curry, once the tomatoes are soft and mushy, remove the cover and cook on medium flame for about 4 to 5 minutes.

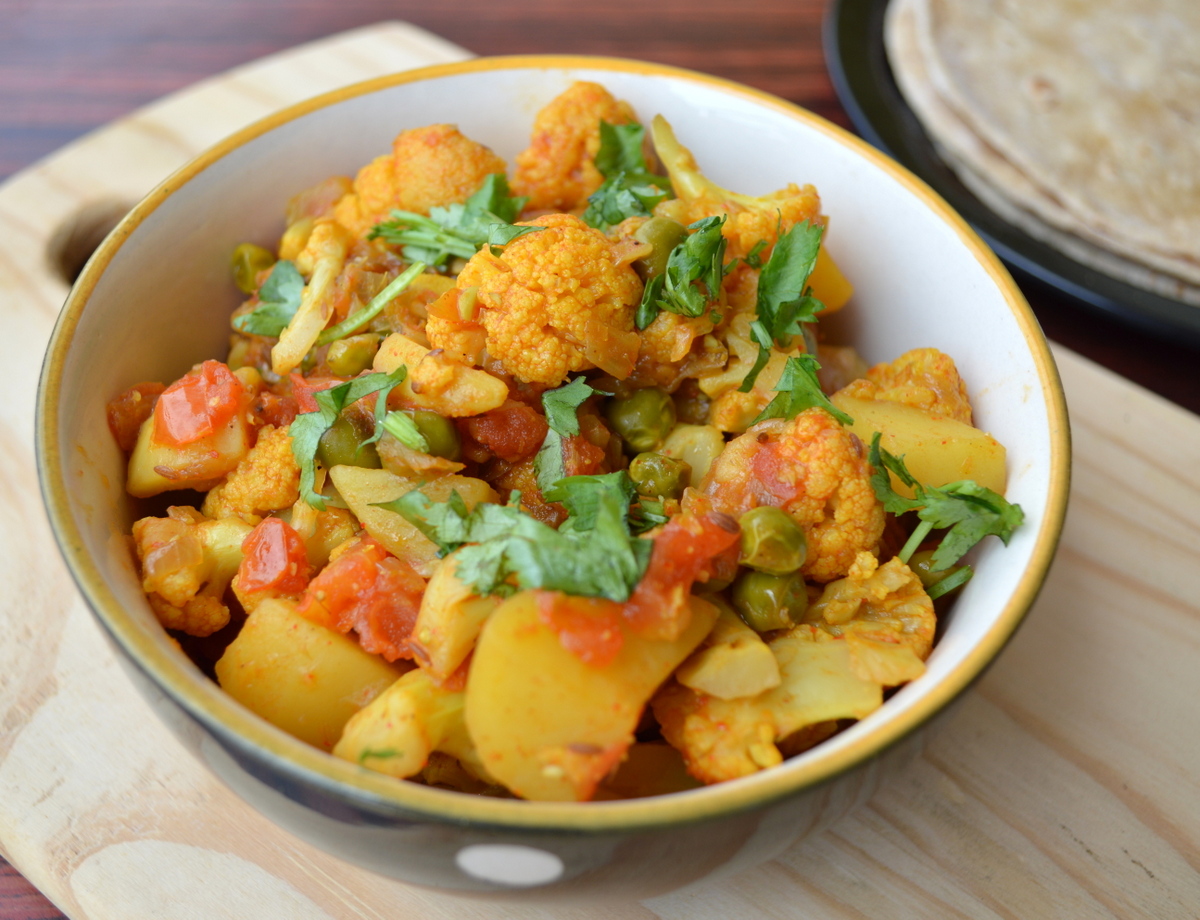
Garnish with chopped coriander leaves and serve hot with rotis or parathas.


Variation:
  1. You can add fresh or frozen peas as well to this curry. It tastes good. I did add a handful of peas in the above recipe.
  2. Try not to add any water while cooking the veggies else the cauliflower may turn mushy.

Monday, November 19, 2012

Rava Idly


I still remember the first time I tasted Rava Idly. It was in MTR, Bangalore. My husband does not like eating out very frequently whereas I was just the opposite. I would just wait for the smallest opportunity to eat out. It was on one such occasion, my SIL had come to visit us and she wanted to see at lalbagh. So I, my SIL, and her husband went to Lalbagh. By this time I had already, tempted my SIL about the delicious food in MTR. So it was decided that we have breakfast at MTR and then head to Lalbagh. Somehow we got late in started from our house and by the time we reached MTR the breakfast session was almost over and when asked what was available, the waiter, told us that he had only Rava Idly and coffee.

On hearing that I was very disappointed as I had been thinking of having some hot Dosas. Anyways, with no other choice we waited for the Rava idly to arrive. When it came, I was taken aback by its size, it was really big. There were 2 to 3 varieties of chutneys and sambar. The Idly was really soft and very delicious. It was one of the most memorable breakfasts.

Ever since, I wanted to try making it at home. I immediately bought the MTR Rava Idly mix and used to make idlis with it for a long time. At some later stage I got this recipe from my grandma, though she used baking soda I prefer to use Eno fruit salt. It really makes the idlis very soft and they stay that way for a long time. You can prepare it ahead of time and just heat it in a microwave before serving.
So here is the recipe:


What you’ll need
  1. Bombay Rava – 1.5 cup
  2. Curd – 1 cup
  3. Water – 1.5 cup
  4. Ginger - 1 inch piece, grated
  5. Green chilly – 1 or 2, chopped
  6. Carrots – 1 Medium, grated
  7. Coriander Leaves – 2 tbsp, freshly chopped
  8. Eno Fruit Salt – 1.5 tsp

For tempering
  1. Mustard Seeds – 1 tsp
  2. Bengal Gram Dal – 1 tsp
  3. Asafoetida – 1 big pinch
  4. Curry Leaves – a few sprigs
  5. Cashew nuts –about 10 broken
  6. Oil – 1 tbsp
  7. Ghee – 1 tsp

Method
  1. Heat a Kadai and dry roast the rava till a nice aroma starts coming. Transfer into another plate.
  2. Heat the same kadai with oil and ghee, add mustard seeds, once it starts spluttering add the Bengal gram dal, and cashew nuts fry till golden.
  3. Add asafoetida, fry for about 30 secs.
  4. Add chopped green chillies, grated ginger and curry leaves. Fry for another minute.
  5. Next add in the grated carrots and sauté for about 2 minutes.
  6. Add the roasted rava and fry for another 2 minutes.
  7. Remove from heat and let it cool.
  8. In a wide bowl, add the above roasted and tempered rava, salt to taste, curds and mix well.
  9. Add water gradually, until the batter is of pouring consistency. Not too thick and not too runny.
  10. Keep aside.
  11. Grease idly moulds, heat the idly cooker or pressure cooker with water.
  12. Now add the eno to the rava batter mix well and pour immediately into idly moulds and steam for 8 to 10 minutes.
  13. Serve hot with Milagai podi, chutney or sambar.


Note:
  1. Pour immediately after adding Eno, do not let the batter rest.
  2. You can add chopped onions while sautéing.
  3. You can also add boiled peas.


Wednesday, November 14, 2012

Babycorn Masala


With the Diwali fever over, everyone must have fallen back into their regular routine. After indulging in all the oily and sugar laden sweets and savouries, I was just craving for some very simple comforting food like Rasam and Kootu or even just some curd rice. I have been having only things like that for the last couple of days.

I had prepared this Babycorn Masala for lunch few days before Diwali. My children love eating babycorn as such and they just loved this gravy since it was very mildly spiced. Both my kids were asking for more and more helpings. What more can a mother ask for? So here is the recipe:


What you’ll need
  1. Babycorn – about 15
  2. Turmeric Powder – ¼ tsp
  3. Coriander Powder – 1 tsp
  4. Chilly Powder – 1 tsp
  5. Garam Masala Powder – ½ tsp
  6. Kasuri Methi – 1 tsp, crushed
  7. Cumin Seeds – 1 tsp
  8. Salt to taste
  9. Oil – 3 tbsp

For the gravy
  1. Onion – 2 Big
  2. Tomatoes – 3 – 4 Medium
  3. Garlic – 2 cloves
  4. Ginger – 1 inch piece
  5. Cashewnuts – 5 to 6

Method                                                                                                             
  1. Wash and the babycorns into halves vertically. Chop the capsicum into big cubes.
  2. Cook the babycorn in salted water for 5 minutes. Drain and set aside.
  3. Heat a Kadai with a tbsp of oil. Once heated, add roughly chopped onions, grated ginger and crushed garlic cloves.  Saute for few minutes or till the onions turn light brown. Cool and grind alongwith cashewnuts into a smooth paste.
  4. In the same kadai, add a tsp of oil and add the chopped tomatoes. Saute till they get soft. Cool, grind and keep aside.
  5. Also sauté the capsicum cubes and set aside.
  6. Heat a Kadai with the remaining oil, Add cumin seeds once they splutter add the fried onion – cashew paste and fry for 4 to 5 minutes on medium flame.
  7. Add the turmeric powder, coriander powder, and chilly powder and fry for a minute.
  8. Next add the tomato paste and fry for another 3 to 4 minutes.
  9. Add the cooked babycorn and sautéed capsicum. Add salt to taste and mix well.
  10. Add enough water to adjust the consistency about 1.5 to 2 cups.
  11. Add crushed kasuri methi and mix well.
  12. Cover and simmer for 5 to 6 minutes. Remove from heat.


Delicious Babycorn Masala is ready.


Serve hot with Rotis or any Indian flat bread.


Thursday, November 8, 2012

Gulab Jamun using Khoya/ Easy Diwali Recipes


Today, was one of the happiest days of my life. My younger one, officially started school today, though only play school. We had been planning to put her in play school ever since June, but somehow it just did not happen. Finally, she started her never ending journey of official learning today.

I can call myself the happiest and luckiest mom, as my lil one woke up, got ready and went to school very happily. As soon as we reached the school compound, the scene there made me worry a little. Most of the little kids were wailing and not ready to even enter the gate. I was worried that looking this my lil one may also start crying. But thankfully nothing like that happened and when I went back after a couple of hours to pick her up, she came out smiling beautifully. She really made my day today.


Now coming to today’s recipe, In the days of my grandfather, no Diwali is complete without Gulab Jamuns. Every year Gulab Jamuns, Badusha and Jangiri would be prepared in large quantities. This has kind of stuck with most in the family. Though I don’t prepare badusha and jangiri, my Diwali sure is incomplete without my favourite Gulab Jamuns. We still remember the delicious Jamuns my grandfather used to prepare using Khoya. They were the melt in the mouths kinds, but not melt in the syrup, if you know what I mean. 

I have been making jamuns for long now with store bought ready mixes, sometimes they turn out good and sometimes, they become so soft that they just disintegrate in the syrup.
But, with this recipe, I’m sure my search for the perfect jamuns has come to end and I have decided never to go for the ready mixes any more.


Makes – about 25 small Jamuns

What you’ll need
  1. Unsweetened Khoya/Khova – 1 cup (You can use homemade or store bought, I used store bought)
  2. Maida/ All purpose Flour – ¼ cup
  3. Baking Soda – 1/8th tsp
  4. Ghee/Oil for Deep frying

For the sugar syrup
  1. Sugar – 2 ½ cup
  2. Water – 2 ½ cup
  3. Rose Essence – ½ tsp

Method
  1. If your khova is refrigerated, keep it outside and let it come to room temperature. This will make it soft too.
  2. Sieve the Maida and baking soda.
  3. In a wide bowl, add the khova and crumble it very well without the slightest of lumps.
  4. Add the sieved maida and baking soda and knead into smooth dough.
  5. Cover and set aside.
  6. Heat another heavy bottomed vessel, measure the sugar and add it to the vessel with equal about of water.
  7. Let the sugar dissolve completely and strain for impurities if required.
  8. Pour it back into the vessel and let it come to a boil.
  9. Once it starts boiling, simmer and keep it on low to medium flame for exactly 15 minutes. Turn off flame.
  10. Add the rose essence to the sugar syrup after 5 minutes.
  11. For making the jamuns,
  12. Heat oil or ghee for deep frying in a Kadai.
  13. Make small balls out of the dough, make sure there are no wide cracks. Do not press too had while making the balls.
  14. Once the smoking point of the oil has reached, turn the flame to low.
  15. Fry the jamuns 4 to 5 at a times on low flame until the desired colour has been achieved.
  16. Drain and transfer them into the sugar syrup.
  17. Do the same for the remaining jamuns.


That’s divinely delicious Gulab Jamuns are ready. Serve warm or cold.

Wednesday, November 7, 2012

Cornflakes Mixture


Here is a simple and really quick savoury snack. If you are pressed for time and still want to prepare something this Diwali, then this is definitely for you. This is something no one can go wrong with. Even beginners can prepare without any problem.

Be sure to ask for unroasted cornflakes. In India you may not find it in the supermarkets, but you will surely get in your regular grocery store. Ask for cornflakes for making mixture. I got it in one of the small grocery stores near my house.

By any chance if you are unable to find unroasted ones, use the regular unsweetened breakfast cereal and the fried nuts and season with the spice mix. You are ready with a much healthier version of the mixture. You can even try microwaving these unroasted cornflakes, which I plan to try very soon. Microwave version will surely be a healthy snack. A little indulgence during festivals is surely ok isn't it. So go ahead and try this simple and really quick recipe.


What you’ll need
  1. Cornflakes unroasted – 4 cups
  2. Groundnuts -  ½ cup
  3. Cashew nuts – 15 to 20 broken into halves
  4. Raisins – 20 to 25 (optional)
  5. Curry Leaves – 3 to 4 sprigs
  6. Oil for deep frying

For the spice mix
  1. Salt – as required
  2. Chilli Powder – ½ tsp
  3. Asafoetida/Hing – generous pinch


Method
  1. Wash the curry leaves and spread on a newspaper for it to dry.
  2. Heat a pan with oil for deep frying.
  3. In a strainer, add the cornflakes in small batches, dip the strainer in oil and fry.
  4. Drain into absorbent tissue.
  5. Similarly fry the groundnuts, cashew nuts, raisins and curry leaves and add it to the fried cornflakes.
  6. Now add the spice mix to the above and toss well. Try not to mix with any spatula as it may cause the cornflakes to powder.
  7. Cool and store in airtight containers.


Monday, November 5, 2012

7 Cup Cake/Burfi


Don’t get misled by the name 7 cup cake, no, it is not a cake rather it is a burfi – a soft one. It is something very similar to the Mysore Pak. It gets its name from the number of cups of ingredients. The measurements are very easy to remember: equal measures of besan, coconut, milk, ghee and 3 times sugar.

I am quite apprehensive about preparing any kind of burfis. You need to know exactly when to transfer to the greased tray. If early then you end up in halwa like consistency and if late your sweet may crumble and become powdery. So removing from heat at the right stage is the key to getting delicious and pretty looking burfis.

I have tried my best to explain the various stages. In case of any queries please feel free to contact me.


Makes about 25 Medium sized pieces

What you’ll need

  1. Besan – 1 Cup
  2. Scraped Fresh Coconut – 1 Cup
  3. Milk – 1 Cup
  4. Ghee - 1 Cup
  5. Sugar – 3 Cup


Method

In a heavy bottomed Kadai, add the besan, scraped coconut, sugar, milk and ghee.
Mix well, without any lumps.
Grease a tray and keep aside. Also grease the underside of a flat cup.
Place the Kadai on heat, and start cooking on medium heat. Keep stirring.


After a few minutes the mixture will become smooth and will start boiling.
Keep stirring, on low to medium flame.


In the next stage, the mixture will start thickening.


Keep stirring. Next the mixture will get thick, and leave the sides. The mixture becomes frothy the sides.


At this stage, remove from flame and transfer into the greased tray. Smoothen the top by tapping with the greased underside of the cup.
Allow to cool for a few minutes and then mark the pieces with the help of a sharp knife, while still warm.


Cool completely, remove the pieces carefully and store in airtight containers.


Thursday, November 1, 2012

Omapodi - Diwali Recipes


Diwali is round the corner. For most of us, Diwali is synonymous with family get togethers, new clothes, crackers, lights, sweets, snacks and lots of happiness. The spirit of Diwali doesn’t spare anyone. It has not left the blog world too. It’s a delight to see all the blogs with tempting pictures and recipes for Diwali.

I have also planned to post a few recipes for Diwali. Omapodi is one of the easiest savouries to prepare. This was one of the first savouries I tried. I have been cooking and helping my mom in the kitchen ever since I was in the IX standard. The interest may have stemmed from my love for eating delicious food. But I never ventured into deep frying until very recently. I am very scared of hot oil (there is no particular reason I can think of for this fear) and for many years even after marriage, I never thought of preparing deep fried food all alone, without my mom or mil around. I would not even fry puris. I usually roll out the puris and frying job would be done either by my mom or mil (whoever’s around at that time).

It is only after I decided to start this blog that I thought of somehow overcoming my fear of hot oil. I decided to prepare bhajias and with mom by my side, following her instructions carefully, I did fry my first batch of bhajias successfully. Since then, though I am no more terrified of deep frying, but still whenever I am, there is a small fear at the back of my mind and so I am usually extra careful while deep frying.

Leaving my fear behind, I fried these crisp and crunchy batch of Sev/ Omapodi. Here is the recipe:


What you’ll need
  1. Kadalai Maavu/Besan – 1 cup
  2. Rice Flour – 2 tbsp
  3. Ajwain/Omam Powder – ½ tsp (See Notes)
  4. Chilli Powder – 1 tsp
  5. Salt to taste
  6. Ghee/ Butter – 1 tsp
  7. Oil for deep frying
Method
  1. Sieve the rice flour and besan.
  2. Transfer into a bowl
  3. Add the ajwain powder, salt and chilli powder. Mix well.
  4. Also add the ghee or butter and mix well.
  5. Now add water little by little and knead into soft sticky dough.
  6. Fill ¾ of the Sev press or Nazhi with the dough.
  7. Meanwhile, heat a Kadai with oil for deep frying. To test for the right temperature of oil, add a small piece of the dough into the oil, if it sinks and immediately comes up then the temperature is just right.
  8. Press the sev press in a circular motion into the hot oil. Start from the edge of the kadai, go in a circle and finish in the middle. Keep the flame low while pressing as hot steam from the kadai may burn your hand.
  9. Fry on medium flame till one side gets cooked, flip over with the help of a slotted spatula and cook for another 1 or 2 minutes or till the bubbles and sounds stop.
  10. Repeat the same with remaining dough.

Cool and store in airtight containers.


Note:
  1. Powder about 4 to 5 spoons of ajwain in a mixie, sieve it well and then use.
  2. You can also grind the ajwain with water, strain and use a tsp or two of the water while making the dough.
  3. Make sure to use fresh besan, using very old besan or kadalai maavu make make your omapodi bitter. 
  4. Also do not use too much of omam or ajwain, this will also make the omapodi bitter.
  5. Don’t make the dough too tight or loose. Making it very tight will make it very difficult for you to squeeze out the dough in the oil and a very loose dough will result in oily omapodi.
  6. If you are preparing in large quantities, prepare the dough little at a time. As the omapodi tends to become a darker shade of red while frying.


Related Posts Plugin for WordPress, Blogger...